Enviro
https://lightbug.io/product/lb-dev-en2/ (opens in a new tab)
Overview
The Envrio works in a similar way to the Pro.
The main visual difference is that the Enviro is white and has holes in the top of the device, to allow for better sensor readings.

LED Indicators
The LEDs indicators can be found on the side of the enviro.
The small icons above each of the indicators show what information they display.
![]() Battery
Battery
![]() GPS signal
GPS signal
![]() GSM signal
GSM signal
These indicators can light up while transmitting, or as the result of a button press.
Buttons
Quick Button Press
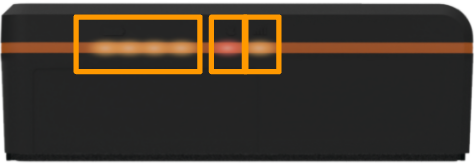
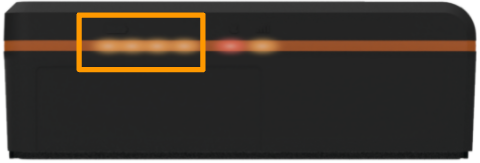
Pressing the button the tracker for less than 1 second will display the following information (from left to right).
![]() The current charge of the tracker with 1-4 LEDs glowing solid orange
The current charge of the tracker with 1-4 LEDs glowing solid orange
- 1 LED – device is 0%-25% charged
- 2 LEDs – device is 25%-50% charged
- 3 LEDs – device is 50%-75% charged
- 4 LEDs – device is 75-100% charged
![]() GPS signal *
GPS signal *
Solid orange 🟧 when operational, but solid red 🟥 when GPS is unavailable.
It is normal for GPS to be unavailable when the tracker is indoors.
![]() GSM signal *
GSM signal *
Solid orange 🟧 when operational, but solid red 🟥 when GSM is unavailable.
GSM may not be available in areas with poor cell phone coverage.
*The signal indicators are for diagnostic purposes only.
1-3 Second Button Press
Pressing and holding the button for 1-3 seconds will force a location update.
This will update any pending settings, but not affect any saved settings.
The battery LEDs will flash from left to right in a cycle, and you will hear a small beep.
15 Second Button Press
Pressing and holding the button for 15 seconds will force a hard reset
This will update any pending settings, but not affect any saved settings.
This button press is recommended if you are facing network related performance issues.
The battery LEDs may go blank for a second, but then will flash from left to right in a cycle, and you will hear a small beep.
Charging
You will need to charge your Lightbug enviro for at least 5 hours before initial use.
The Lightbug enviro can be charged using the included Charging Dock either via wall adapter or via USB port.
It is advisable to use an adapter plugged into a power socket rather than using a computer USB port or similar.
Hint: Our trackers support Quick Charging! With Quick Charge, you can fully charge a depleted Pro tracker in just 2.5 hours.
When placing the tracker onto the charging dock you will hear a beep and the battery LEDs will light up.
While charging, the battery LEDs display the charge of the device like a power bank:
- 1st LED light blinking orange – the device is 0%-25% charged and charging
- 2nd LED light blinking orange – the device is 25%-50% charged and charging
- 3rd LED light blinking orange – the device is 50%-75% charged and charging
- 4th LED light blinking orange – the device is 75%-99% charged and is charging.
The battery LEDs will turn off once the device is fully charged.
A quick button press will display the state of charge.
Activation
To activate your tracker, you need to use the Lightbug Cloud app, and to follow the Getting Started guide.